
How to Attach a Vinyl Head to the New Tenner Body
Supplies needed:
one 8" hemostat - curved or straight (easy to find on eBay)
one 25 mm screwgle (also called coil screw), supplied by us with your Tenner body (also found in most doll making supply catalogs)
a sharp, safe hobby blade, like an Exacto Knife
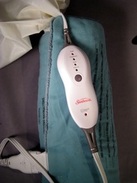
maybe an electric heating pad
one Tenner body
one Tonner vinyl doll head
very clean hands (your dolly will thank you for this!)
Freeing the head:
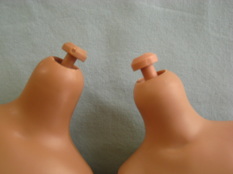
There are two different ways that the 10" child doll heads are held on their original Tonner bodies. The older dolls, with straight legs, are held together with elastic stringing. The newer dolls' legs are held on by mechanical means and thus there is no stringing up to the head. Instead the head is popped onto a peg with a button on the top of it that comes out of the top of the neck.
You will, eventually, need to cut a hole in the back of the head, no matter which type of head connection you are dealing with, so I recommend removing the wig right from the start (to save wear and tear). This is usually not too difficult - find an edge of the wig cap at the back neck and gently pull up on it. If it doesn't "give" in the first place you try, try another place. Once you have a little bit of the wig lifted, it gets easier and easier to pull it away from the head. If you have difficulties, try slipping a spoon under the part that you have succeeded in lifting and using that for leverage.
one 8" hemostat - curved or straight (easy to find on eBay)
one 25 mm screwgle (also called coil screw), supplied by us with your Tenner body (also found in most doll making supply catalogs)
a sharp, safe hobby blade, like an Exacto Knife
maybe an electric heating pad
one Tenner body
one Tonner vinyl doll head
very clean hands (your dolly will thank you for this!)
Freeing the head:
There are two different ways that the 10" child doll heads are held on their original Tonner bodies. The older dolls, with straight legs, are held together with elastic stringing. The newer dolls' legs are held on by mechanical means and thus there is no stringing up to the head. Instead the head is popped onto a peg with a button on the top of it that comes out of the top of the neck.
You will, eventually, need to cut a hole in the back of the head, no matter which type of head connection you are dealing with, so I recommend removing the wig right from the start (to save wear and tear). This is usually not too difficult - find an edge of the wig cap at the back neck and gently pull up on it. If it doesn't "give" in the first place you try, try another place. Once you have a little bit of the wig lifted, it gets easier and easier to pull it away from the head. If you have difficulties, try slipping a spoon under the part that you have succeeded in lifting and using that for leverage.
|
To get a newer doll's head off of the neck peg you will take advantage of the fact that the vinyl that the head is made out of will become soft and elastic if it is heated (and the plastic that the body and peg is made out won't get soft if heated [unless you heat it to the point of melting - NOT recommended!]) The following instructions are based on a very thorough description of the process on the Life and Times of Ann Estelle website - http://www.thelifeandtimesofannestelle.com/how-to-change-noggins.html
|
|
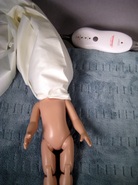
Andria (the author) suggests wrapping the entire doll in an electric heating pad, set at "high". Check the doll every 15 minutes to see if the head has softened - it may take up to an hour. Once the vinyl is elastic, you will be able to wiggle and squeeze the head off of the neck peg. Andria says you may need to "use a little force, but it will work".
To get an older, strung doll's head detached, you must grasp the doll's head and pull it away from the body. You will see a metal hook coming from inside the head, hooked to the elastic loop that goes through the body, down to the legs. You have two choices: if you think you are never going to want to use the old body again, you can simply cut the elastic (easiest with something strong like a pair of wire clippers). If you think you might want to use the old body again, you should instead attempt to keep the factory installed stringing intact. Pull the head so far away from the body that you can see a half inch long loop of elastic and catch the elastic with your hemostat. This is much easier to do if you have four pairs of hands. If you don't have four pairs of hands, and you're going to be doing this a lot, consider installing a #8X 2 9/16 screw hook (from your hardware store) into a wall of your home, at about waist height, making sure it is screwed into a stud, not just drywall, since you're going to be putting a lot of pressure on it (maybe in a closet or somewhere you won't see it too obviously). (This hook is shown in the short video presentation down lower on the page.) Working alone, with the open hemostat in your pocket, pull the head away from the body and loop the elastic onto the hook. Now you can pull the body away from the hook with one hand and catch the stretched elastic with the hemostat with your other hand! Then remove the doll (with dangling head) from the hook. Nifty! Two hands or four hands, either way, at this point slip/wiggle the head hook out of the elastic loop and run something like a nail or a crochet hook through the now-empty loop, release the hemostat and you have a still-strung Tonner body in one hand and the detached head in the other!
If you really like the factory installed hardware inside the old heads (and you haven't let go of the hook and had it all disappear into the head!) you can use that hook to attach your head to the new Tenner BJD body. I personally don't recommend this because I feel substituting a 25 mm screwgle makes for much nicer range of movement in the head on the neck and is also much easier to hook and un-hook.
If you want to get rid of the factory installed hardware and use a screwgle, you will next need to open up the back of the head. Once again you will take advantage of the softness of heated vinyl. I will digress here to warn that while we seem rather casual about telling you to heat up your doll, do remember that you can inflict permanent damage if something goes awry. Picture this - you've just warmed up your doll head to the point it is nice and flexible and the phone rings so you put the head down. The phone call is your friend who wants to tell you her theory of what diabolical hold Thomas, the nasty butler, has over Lady Cora's new ladies maid in "Downton Abby" and while she's doing this your 20 pound cat has decided to sleep on top of the warm head. By the time the thirty minute phone call is over, the head is cool and hard but since it cooled while the cat was sitting on it, it is now looks permanently like a 20 pound cat sat on it. In other words, squashed!
|
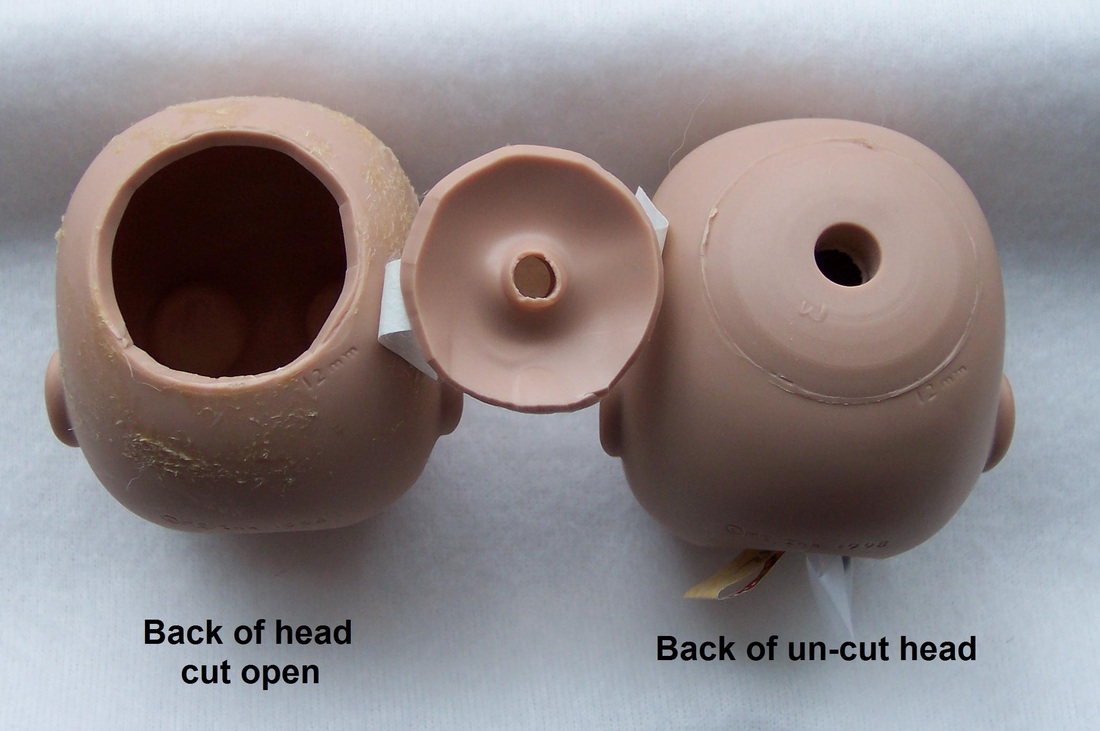
With that warning off my chest, we now proceed to warming the back of the head so that you can cut an opening in it. You could use the heating pad method described in the section about getting heads off of "new" bodies, or you could try heating up a small amount of water (half inch deep or so) in a tea cup in the microwave and then resting just the back of the head in the hot water. The hotter the water is, the faster the vinyl will get soft. Take your Exacto knife and slide it into the vinyl at some point in the circle you'll see on the back of the head, then pull the knife evenly around the circle. Don't "saw". If your knife is sharp and the vinyl is warm enough, it will be very easy to do. You can take the entire circle off or you can leave it "hinged" by not cutting the entire circumference - hing it at the top, not the neck side of the circle.
Dump what water may have gone inside the head; pull out the factory installed hook and plastic dome; dry up any remaining water and get ready to put the head on your new Tenner body! |
|
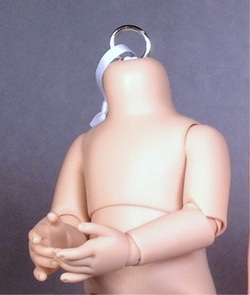
Your Tenner body will arrive with the stringing held outside the body by a ring at the top of the neck. You will have to cut this ring (unless you want to restring the entire body, which is OK, if you want to do that!) and it is not hard to cut with wire clippers. Before you cut it, pull the ring away from the body and catch about a half inch of both the loops of elastic (you will see two) with your hemostat (using your newly installed wall hook??) Realize that you are making the hemostat hold four cross-sections of elastic here, so make extra sure that you've tightened the teeth on the hemostat so that it will hold.
Put the screwgle inside the doll head and maneuver the hook end down through the hole in the base of the head. The coil part will cup the inside of the base of the head (and thus spread the stringing tension evenly around the neck.) Then wiggle the hook through the two loops of elastic held by the teeth of the hemostat, carefully release the hemostat and let the elastic pull the head down flush on the neck. Glue the circular piece of head back into the opening. I prefer to use a rather weak glue, like Aleene's Tacky Glue so that if I decide to switch heads around again in the future it is easy to pry open the hole again. Ta dah! That's it! Here's a "hands-on" video presentation of the same information presented above. |
|
A Few Words about BJD Stringing and Joints
All ball jointed dolls that are connected with elastic require periodic "tune-ups" in the tension of the elastic, mostly because all elastic ages and elastic that is kept in a constant state of expansion eventually begins to tire and loose it's elasticity. It is important that ball jointed dolls are strung with the "best" tension - you may have problems getting them to hold a pose if the tension is too loose or if the tension is too tight.
So look at the stringing of your new Tenner body and familiarize yourself with it. Notice that the loops coming up from the legs to the head cross paths with the loop going from arm to arm at the front of the chest (i.e. not in back of the arm loop). Notice that the factory has strung the doll so the knot in the leg-to-head loop is in the middle of the body (i.e. not down in one of the legs or up by the neck).
If, by chance, you (or your hemostat) loose your grip on the elastic loop coming out of the top of the neck and the elastic goes "bo-ing!" and you have the legs and the lower part of the torso in one hand and the arms attached to the upper part of the torso in the other hand, don't despair!! In all probability the elastic will rest on the inside of the crotch and, unless you really shake the pieces around, the feet, leg parts and lower torso will stay nestled together. So just catch the two elastic loops with a loop of something like a strong-but-light-weight piece of wire; feed the wire through the hole in the neck (taking care to go in front of the arm elastic, not behind it); pull hard on the wire until the elastic emerges from the neck and re-catch it with your hemostat. You may also be able to catch the loops with a crochet hook fed through the neck hole, but do take care to not put too much pressure on the edge of the neck hole with the metal crochet hook.
If you do have to make any adjustments to the factory stringing (and keep in mind I'm saying "if" - I don't assume you will have to!) it will most probably be to tighten the stringing. You can do this by either taking the head off and intentionally letting the elastic slip into the body, or by pulling the two parts of the torso away from each other and isolating the knot in the elastic with two hemostats on either side of it. Then untie the knot (which is currently not under pressure) and retie it, shortening the loop. Try shortening by only an inch or so to start with and do not cut off the extra (in case you need to loosen it up again.)
Many BJD lovers find that another way to help the stability of resin ball jointed dolls is to add sueding to the joints. This essentially acts in the same way cartilage does in our own bodies - something that cushions the bone from the bone and adds a bit of tackiness in the joint. Lots of people do this by applying a film of hot glue to the resin on one inside surface of the joint. The old fashioned way is to cut a correctly sized and shaped disk of extremely fine leather (called pliver) and glue it to one inside surface of the joint. And nowadays you can also buy what some people call kips, which are washers made out of thin sheets of silicon - you string one of these within the joint. Lots of choices if you decide your doll needs sueding!
Hope this helps!!! Roberta